

|
|
|
|
|
Before discussing the various tests used in evaluating phosphate coatings, a common misconception needs clarifying: Phosphate coatings should not be considered as separate entities or an end result in themselves. In simpler terms, phosphate coatings are not intended to be a final protection but are meant to improve or enhance the value of a subsequent organic coating such as paint, oil, wax for rust protection, and drawing compounds in the performance of metal working. Although phosphates do provide a measure of corrosion protection in themselves, it is not recommended they be used in that way. Their real value comes in conjunction with their being used with either paint, oil, or wax. The poor resistance of a bare phosphate coating to corrosion should never be considered as a poor coating. Quite often it is difficult to determine by mere visual inspection whether the phosphate is good, accept-able, or poor.
Because failure in coating can take as long as six months to occur, it had been found necessary to develop methods of accelerated testing to learn in a few days or weeks the relative corrosion protection values of the coatings. One must understand though the accelerated corrosion tests are at best, only indications, and under certain conditions may not prove reliable at all, The main reason for erroneous and misleading results in accelerated testing is that there are many variables involved in each test, any one of which can make results unrepresentative when not properly controlled. An example of this; It is possible to obtain a wide variance in results on parts coated in the same phosphate system but with each part having a different paint. To point this out more clearly; in a humidity test, one paint can break down in 24 hours while another one can go 2000 hours on the same phosphate undercoat. Even before encountering the variables involved in the individual test results themselves, minor differences in such things as paint application methods can have a profound effect on results, without any change in phosphate coating. The following five items of controlling production painting determine what the performance quality of the painted parts. will be.
Baking time and temperature are very critical. Curing of paint involves an actual chemical reaction wherein paint changes form. If the proper time (curing) and baking temperature are not applied, the desired end-product (the painted surface) may not be obtained. Viscosities change with atmospheric pressure and humidity, and proper paint flow and spreading ability will not be obtained with improper viscosity. Paint thickness is self-explanatory — usually, the more thickness, the more protection (except when too thick). Blistering can occur from excess solvents used in an attempt to evaporate. Finally, curing time is extremely important with most paints. This is the time required for full polymerization to occur, the final form of paint. Solvent evaporation can not be completed without 72 hours of further curing (give or take a few hours: depending on the humidity) after baking.
This particular test is one of the most realistic for determining corrosion resistance because there may be fairly good correlation with actual field performance. There may also be fewer more controllable variables. This value however, is still a relative thing, since there are many items to be controlled. The average humidity cabinet is an air-tight, moisture-proof box with a roof or top sloping to one side. This design is for the purpose of allowing condensation collecting on the roof to run down the side of the cabinet rather than directly on the parts being tested. Normally, temperature is controlled at 100° F plus or minus 2 deg. with 100% relative humidity. In some humidity cabinets moisture is introduced by fogging. Others merely have a reservoir of distilled or de-ionized water, and moisture is circulated by a small fan inside the cabinet.
These are known as recirculating humidity cabinets. In more common use however, is a cabinet containing a reservoir with no circulation included; this is the condensing type and generally is a more severe test, causing earlier breakdown because more moisture collects on the parts than with the recirculating type. Most specifications call for placing panels to be tested on a rack in the cabinet at an angle of 15° up to 30° off vertical, and then observe the upward side for failure. This is done so all panels receive an equal amount of condensation, at least on the one side. The important variable here, how-ever, is that many people ignore this requirement which causes non-rep-resentative and non-reproducible results. Another variable exists in that different areas within the cabinet will receive varying degrees of condensation depending on the basic construction of the unit.
In observing panels during a humidity test we are looking for the first appearance of blistering as an indication that paint breakdown has begun. As in all corrosion. tests on painted panels, the principle involved here is based on moisture permeating or working its way through the paint film to the metal surface beneath where it begins its oxidative attack, unless, of course, the surface has been properly phosphated and therefore resistant to oxidative attack. In the case of an unphosphated surface, the moisture, after penetrating the paint, causes oxidation or rust to form, the by-product of this reaction being Hydrogen gas. The production of this gas causes pressure to build up, thence causing blisters to form. The same situation can occur when residual salts or acids are present on the work or panels after phosphating. As these residues dissolve in the water that has penetrated the paint film a pressure condition is produced similar to gas formation, and as it expands, a blister develops. When the pressure or gas is slight, consequently the size of the blister is small. The panel must be observed immediately upon removal from the cabinet otherwise the pressure being relieved as the gas escapes through the paint film causes the blister to deflate and therefore disappear. All panels therefore must be inspected closely within five(5) minutes after removal from the cabinet so as to avoid misleading results.
Despite the fact that most salt spray cabinets are more standard by reason of being built to ASTM specification B117, there are so many more variables involved that the test itself is even less representative than a humidity test. Basically, the over-all outside appearance is similar to a humidity cabinet except it is larger. A trough filled-with water all around the perimeter of the top lip where the lid fits on closing, seals the cabinet from any escape of the salt fog. The mechanical progression involved is as follows: Water is introduced into a saturator tower (maintained at a given level and temperature) and is then picked up by air at a specified pressure and blown out through a fogging type nozzle inside the cabinet, mounted upon a siphoning valve which draws out or aspirates salt solution from a reservoir and mixes it with the incoming water-saturated air. This produces a salt fog inside the cabinet, which, when collected in a flask, should test to a desired concentration. Originally, a 20% salt solution was standard, but tests have proved that a 5% salt solution is a more severe test, so this concentration is now fairly universally adopted. This phenomenon is probably due to the fact that the co-efficient of ionization (or chemical activity of the salt) is greater when more water is present.
The salt should be Iodine-free and should produce the proper pH when made up with distilled or de-ionized water. A decade or so ago, ASTM specifications have been revised to include automatic water level controls and the relocation of the fogging nozzle to a tower in the centre of the cabinet for better distribution of the salt fog. The nozzle had previously been located near the bottom at one end of the cabinet. Normally, it is necessary to make up fresh salt solution for the reservoir every 48 hours. The cabinet should operate at 95° F,plus or minus 2 degrees at all times. Therefore, it can be seen that even before considering variables involved with preparing and observing panels, that a host of differences can actually be present in the operation of the cabinet. eg. — water level, air pressure, pH, location and cleanliness of the fogging nozzle, frequency in changing of the salt solution, the type of salt used, concentration of salt solution, and temperature.
In preparing painted panels for salt spray tests, a cross or X is, scored in the paint film. This is supposed to be performed with a special scribing tool made for this purpose, but most people use a knife or some other sharp instrument. If the scribing instrument is too dull, the edges of the scribe in the paint will be more ragged, which, in effect, allows a greater amount of moisture to get into the area of the scribe. Too sharp an instrument will produce the opposite effect. Even the angle at which the scribing tool is held and the pressure applied can have important influence on the test result.
In the inspection of panels withdrawn from the cabinet we are looking for breakdown in the form of:
Rusting at the edges is normally ignored since the thick- ness of paint here is not consistant, often being much thinner than on the main surface.A proper way to eliminate the problem of rusting at the edges is to wax the edges.
The method of inspecting panels can have a pronounced effect on results. To outline:
This test involves immersing the painted panel in water or a solution for a specified length of time and then observing for the first sign of blistering, much the same as is done in humidity testing. The most common method is to completely immerse the panel in distilled or DI water maintained at about 95 to 100 °F. There are, however, many variations from this standard being used today. They are:
The following are just a few of the ways in which manufacturers will alter these immersion tests to suit their individual needs:
This is the most representative corrosion test of all, but since it usually takes as long as two years for test completion it can hardly be called an accelerated test. It is most representative, however, because the paint is allowed to cure completely and under normal conditions of varying degrees of temperature and humidity and precipitation. The most common outdoor exposure test location is on the coast of Florida where panels will receive their share of sun, heat, moisture, and salt atmosphere. In all cases, panels are placed on racks at an angle much as in salt spray and humidity tests. Outdoor exposure tests are also conducted in other representative weather areas of the country, including in particular, heavy industrialized regions where high percentages of sulfur dioxides, nitrous oxides, and other contaminants are present in the air.
This is in less common use than some other tests of physical adhesion, possibly because the cost of equipment is so high, being out of the financial reach of most of the smaller companies. In main, the machine consists of a jig to hold the panel, and a rotating grinding wheel mounted on a pendulum which is attached to an instrument with delicate adjustments for raising and lowering the. pendulum. The wheel is swung back and forth across the painted panel at a gradual rate until the paint abrades. The reading indicating how much the pendulum was lowered is correlated with the width and length of the abrasion to provide final test results.
This consists of a tubular channel mounted vertically, housing a steel ball (usually weighing 1 Ib.), Under the upright channel is a base or fixture for holding the panel, with a hole or depression in the fixture of approximately the same diameter as the ball. The height of the channel will vary from 28" to 80" depending on the type of paint, and the type of metal to be tested. In testing, the panel is placed in the fixture and the ball is raised to varying heights and dropped on the painted surface producing a rounded dent in the metal. As the paint is thus hit and stretched you will look for fractures, stars, or cracks in the paint on the opposite side of the panel at the impact point. The result of the test is expressed in 'inch-pounds' of impact. One variable which causes difficulty in evaluation of results is the thickness of the metal. Obviously, the thicker the metal the less of a dent that is impressed on the metal, and there-fore the less stretching and possibility of the paint cracking.
The device used for this test consists of a steel cone mounted horizontally on a stand. The cone tapers from about 2" diameter at the large end to about l/4" at the small end. A steel bar running the length of the cone is adjusted a fraction of an inch from the cone surface and can move around it, always parallel in the lengthwise position. The panel to be tested is gripped in a fixture next to the cone, and by means of the steel bar is bent around the cone to Conform to its shape. The width of any fracture in the paint and the distance away from the small end that it cracks is then measured for a comparative result. In other words, the largest radius of curvature which produces paint breaks as the panel is shaped around the cone yields information about the quality of the paint and the phosphate coating under the paint.
The equipment in this test consists of a series of pencils of specified variations in hardness, and a special pencil sharpener for reproducing exactly the same point. With each test the pencil is pressed point first, against the painted surface, or a score 1ine in the paint, until the pencil lead breaks, or the point finally penetrates the paint or causes the paint to be released from the metal. Although this method is used in some instances for testing paint adhesion, it is more truly a test for paint hardness.
The accepted method for a standard tape lift test is to score the paint with a scribe in a cross-hatch pattern so as to make squares of approximately 1/8". Masking tape or cellophane tape is applied to the pattern and is firmly pressed into place. The tape is then sharply pulled back upon itself and off the painted surface. The amount of paint adhering to the tape is noted. Problems of consistency in this test are:
In this test the panel is merely bent to observe for fracturing or flaking. The bend is usually 90°, but on applications where more severity is required a 180° bend is used, in which case the panel is pounded flat upon itself through means of a rubber or plastic hammer. This test is practiced by manufacturers of continuous strip pre-painted metal which product will be sold to other manufacturers for forming.
One of the most troublesome variables of all, experienced by those plants in which a dip painting tank or spray operation is not a part of the conveyorized phosphate system, is the lapse of time between phosphating and painting. For maximum quality, phosphated metal should be painted immediately after dry-off. The major reason for this is that phosphate coatings have a tendency to act like blotters, this being the reason they are so effective in soaking up paint thereby promoting maximum adhesion. This same quality however, enables the phosphate coating to blot up, all too effectively, moisture and dust particles from the air, both of which are harmful. Although a phosphated surface is relatively passive and. rust-resistant and can remain in that condition anywhere from from two weeks to six months depending on storage conditions, a progressive gradual oxidation begins to take place immediately after phosphating and continues as long as it is in contact with air and moisture. It is logical to state then, that for every minute it is exposed to air before painting there will be a proportionate decrease in its corrosion resistance. This time lapse problem has a much greater harmful effect on iron phosphate test results than it does on zinc phosphate.
At this point I refer you back to the three basic requirements for good paint adhesion, mentioned at the beginning of this chapter. Many years of experience have proven that regardless of what accelerated tests may show; if a metal stamping or fabrication has a phosphated or roughened surface with no loose deposits, and is passivated by rinsing in a weak chromic acid solution, and shows no corrosion products, the resultant paint coating will stand up for the maximum length of time in the field. On this basis, then, you should now be able to understand the foregoing review of accelerated tests and all their variables, along with the value of maintaining a close check. on the metal being phosphated, making sure it satisfies our three basic requirements. As a final, ‘on-the-job’ double-check using the 'coin', 'knife', and/or educated finger-nail tests dan be extremely useful. By this we mean that any person who has been accustomed to testing paint adhesion by judging the manner in which it scrapes off with a coin or or a knife (i.e.-whether or not it flakes and crumbles excessively) and has learned how paint should perform, by picking at an abrasion with a finger-nail, can obtain an excellent idea of the relative phys-ical paint adhesion. Remember however that adhesion will improve at least 100% after the 12 hour paint curing time previously mentioned.
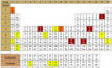
To Obtain coating weight in milligrams per square foot, the phosphate coating must be removed from a previously weighed panel, and the panel weighed again. The following is the step by step procedure of the most common accepted method:
Coating wt; (Mgms./Sq.Ft.) = 144x oss in weight(Mgms) Area in sq. inches
Occasionally a secondary method will be used for determination of coating weight on steel, which involves the use of caustic soda, a strong iron sequesterent and sodium cyanide. The method for removal of phosphate coatings from zinc-based die-cast and galvanized metal would be as follows:
Same as step #1 above.
In running the above tests it should be especially noted that the panel should be first weighed after phosphate coating, never before. otherwise erroneous results would be obtained, since metal is being removed at the same time phosphate coating is added resulting in some loss of weight instead of gaining milligrams. In the case of iron phosphate more metal is removed than phosphate is formed. resulting in some loss of weight instead of gaining milligrams. It is extremely difficult to obtain true coating due to several factors:
![]()